
Android Studio contains a GUI that lets you create and edit a navigation graph. This is essentially an editor for the underlying XML resource file.
Overview
After you've added an XML graph to your app, Android Studio opens the graph in the Navigation Editor. In the Navigation Editor, you can visually edit navigation graphs or directly edit the underlying XML.

- Destinations panel: Lists your navigation host and all destinations in the Graph Editor.
- Graph Editor: Contains a visual representation of your navigation graph. You can switch between Design view and the underlying XML representation in the Text view.
- Attributes: Shows attributes for the selected item in the navigation graph.
Click the Text tab to see the corresponding XML, which should look similar to the following snippet:
<?xml version="1.0" encoding="utf-8"?>
<navigation xmlns:android="http://schemas.android.com/apk/res/android"
            xmlns:app="http://schemas.android.com/apk/res-auto"
            android:id="@+id/nav_graph">

</navigation>
The <navigation> element is the root element of a navigation graph. As you add
destinations and connecting actions to your graph, you can see the corresponding
<destination> and <action> elements here as child elements. If you have
nested graphs, they appear as child <navigation> elements.
Add destinations
You can create a destination from an existing fragment or activity. You can also use the Navigation Editor to create a new destination or create a placeholder to later replace with a fragment or activity.
This example demonstrates how to create a new destination. To add a new destination using the Navigation Editor, do the following:
- In the Navigation Editor, click the New Destination icon
 , and then click Create new destination.
 - In the New Android Component dialog that appears, create your fragment. For more information on fragments, see the fragments overview.
Back in the Navigation Editor, notice that Android Studio has added this destination to the graph.
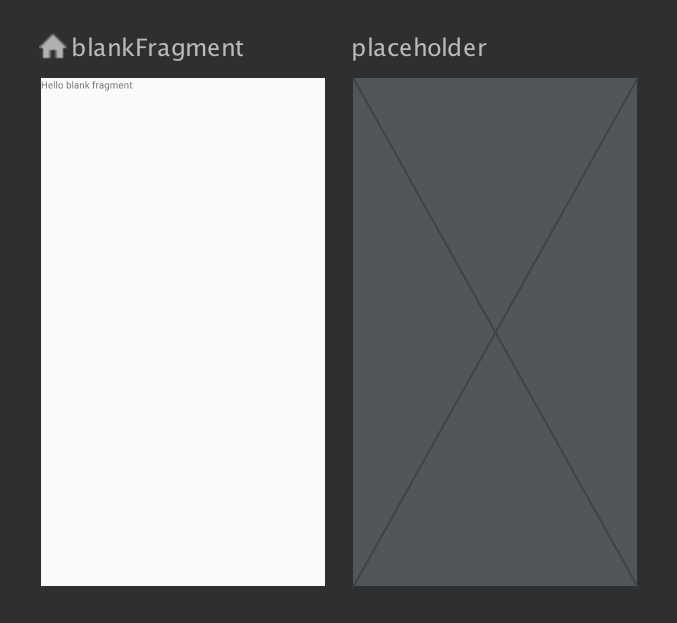
Figure 2 shows an example of a destination and a placeholder destination.
For other ways to add destinations to your navigation graph, see Additional destinations.
Create a destination from an existing fragment or activity
In the Navigation Editor, if you have an existing destination type that you'd
like to add to your navigation graph, click New Destination ![]() .
.
Next, click the corresponding destination in the drop-down that appears. You can now see a preview of the destination in the Design view along with the corresponding XML in the Text view of your navigation graph.
Create a new fragment destination
To add a new destination type using the Navigation Editor, do the following:
In the Navigation Editor, click the New Destination icon
.Next, click Create new destination.
In the New Android Component dialog that appears, create your fragment.
Back in the Navigation Editor, notice that Android Studio has added this destination to the graph.
Figure 3 shows an example of a destination and a placeholder destination.
Anatomy of a destination
Click a destination to select it, and note the following attributes in the Attributes panel:
- The Type field indicates whether the destination is implemented as a fragment, activity, or other custom class in your source code.
- The Label field contains the user-readable name of the destination. This
might be surfaced to the UI—for example, if you connect the
NavGraphto aToolbarusingsetupWithNavController(). For this reason, use resource strings for this value. - The ID field contains the destination ID, which is used to refer to the destination in code.
- The Class drop-down shows the name of the class that is associated with the destination. Click this drop-down to change the associated class to another destination type.
Click the Text tab to show the XML view of your navigation graph. The XML
contains the same id, name, label, and layout attributes for the
destination, as in the following snippet:
<?xml version="1.0" encoding="utf-8"?>
<navigation xmlns:app="http://schemas.android.com/apk/res-auto"
    xmlns:tools="http://schemas.android.com/tools"
    xmlns:android="http://schemas.android.com/apk/res/android"
    app:startDestination="@id/blankFragment">
    <fragment
        android:id="@+id/blankFragment"
        android:name="com.example.cashdog.cashdog.BlankFragment"
        android:label="@string/label_blank"
        tools:layout="@layout/fragment_blank" />
</navigation>
NavHostFragment
You can also use the Layout Editor to add a NavHostFragment to an
activity by doing the following:
- In your list of project files, double-click your activity's layout XML file to open it in the Layout Editor.
- Within the Palette pane, choose the Containers category; alternatively, search for "NavHostFragment".
- Drag the
NavHostFragmentview onto your activity. - In the Navigation Graphs dialog that appears, choose the
corresponding navigation graph to associate with this
NavHostFragment, and then click OK.
Connect destinations
An action is a logical connection between destinations. Actions are represented in the navigation graph as arrows. Actions usually connect one destination to another, though you can also create global actions that take you to a specific destination from anywhere in your app.
With actions, you're representing the different paths that users can take through your app. Note that to actually navigate to destinations, you still need to write the code to perform the navigation.
You can use the Navigation Editor to connect two destinations by doing the following:
In the Design tab, hold the pointer over the right side of the destination that you want users to navigate from. A circle appears over the right side of the destination, as shown in figure 4.
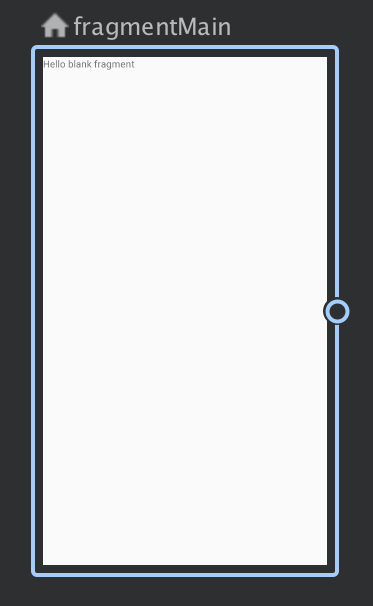
Figure 4. A destination with an action connection circle Drag your cursor over the destination you want users to navigate to, and release. The resulting line between the two destinations represents an action, as shown in figure 5.

Figure 5. Connecting destinations with an action Click the arrow to highlight the action. The following attributes appear in the Attributes panel:
- The Type field contains "Action".
- The ID field contains the ID for the action.
- The Destination field contains the ID for the destination fragment or activity.
Click the Text tab to toggle to the XML view. An action element is now added to the source destination. The action has an ID and a destination attribute that contains the ID of the next destination, as shown in the following example:
<?xml version="1.0" encoding="utf-8"?>
<navigation xmlns:app="http://schemas.android.com/apk/res-auto"
   xmlns:tools="http://schemas.android.com/tools"
   xmlns:android="http://schemas.android.com/apk/res/android"
   app:startDestination="@id/blankFragment">
   <fragment
       android:id="@+id/blankFragment"
       android:name="com.example.cashdog.cashdog.BlankFragment"
       android:label="@string/label_blank"
       tools:layout="@layout/fragment_blank" >
       <action
           android:id="@+id/action_blankFragment_to_blankFragment2"
           app:destination="@id/blankFragment2" />
   </fragment>
   <fragment
       android:id="@+id/blankFragment2"
       android:name="com.example.cashdog.cashdog.BlankFragment2"
       android:label="@string/label_blank_2"
       tools:layout="@layout/fragment_blank_fragment2" />
</navigation>
In your navigation graph, actions are represented by <action> elements. At a
minimum, an action contains its own ID and the ID of the destination to which a
user should be taken.
Placeholder destinations
You can use placeholders to represent unimplemented destinations. A placeholder serves as a visual representation of a destination. Within the Navigation Editor, you can use placeholders just as you would any other destination.